My Korg PolySix Synthesizer Page
I recently purchased a Korg PolySix and have started learning about this great analog synth from the early 80's. I will try to limit this page to things that add to the wealth of repair information that is already on the web.
Here is a redrawn schematic of the anti-log circuit. Note that this schematic applies to the "new production" KLM-366. The old production used two pc bds to hold this circuit, and the trimpot reference designators are not exactly the same. In general, you shouldn't need to mess with the trimmers in this section. Better to leave them alone unless you are absolutely sure they need adjusting. Here is some information about adjusting the anti-log trimmers.
Here is a disassembly of the code in the 8048 patch manager MCU on the KLM-367 board. I have added comments to help explain what the code is doing, but they are mine and are not guaranteed to be 100% accurate. Please let me know if you spot any errors, or have ideas for improvement. I am impressed at how much was accomplished in just 1K of code and 64 bytes of internal RAM. I guess the fact that it's exactly 1024 bytes means that initially it was larger and they had to keep working on it to get it to fit.
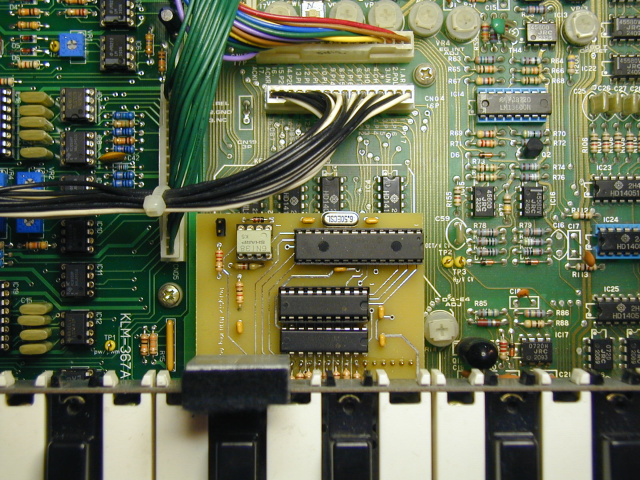
I wanted to add MIDI to my PolySix. There are several options available on the web but I wanted to design my own as a learning exercise. I decided to make it plug in as a replacement for the key assigner MCU, so that it could also be used to repair a synth with a bad MCU chip. I felt that all I really needed was Note On/Off, but later decided to add MIDI arpeggiator clocking as well. I wanted to use through-hole components to make it easier for people to build, which meant that the board would be larger than the 40-pin DIP key assigner and would sit over other components on the Korg PCB. Here is how the prototype version looks installed in my PolySix. (the MIDI cable is not attached in the photo but you can see the two-pin connector for it)
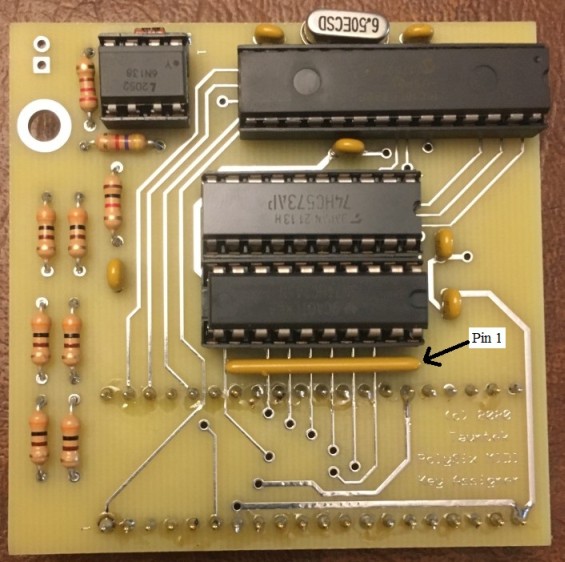
Here is a photo of the current version of the pc board:
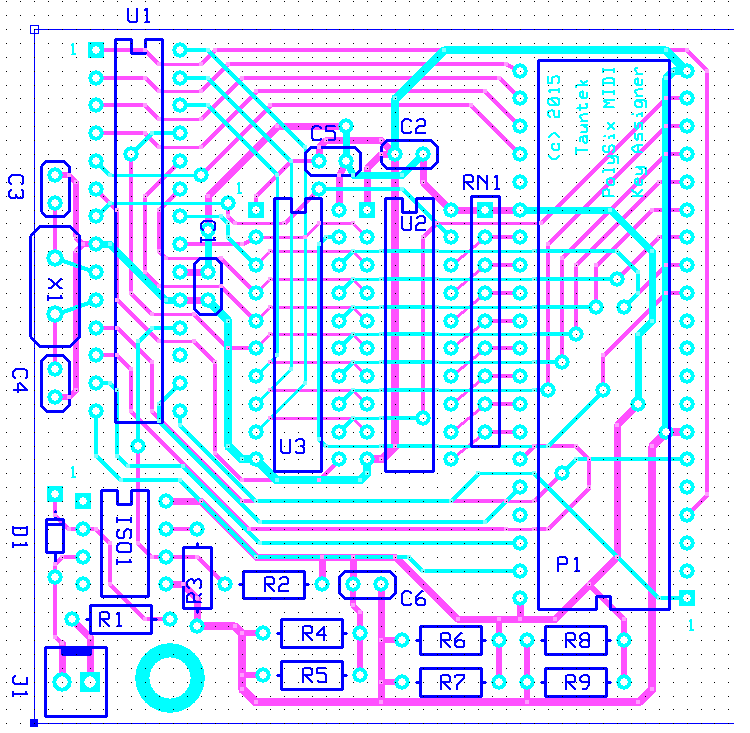
Here is a copy of the schematic. The PIC performs the key assigner function and also interprets MIDI commands to press and release keys. Local keys can be played at the same time, up to a total of six notes, including any MIDI notes. MIDI channel can be set by holding one key down while powering up the PolySix. Low C selects channel 1, C# channel 2, etc. The 17th key selects OMNI mode. Arpeggiator clocking can be set the same way, using keys starting at middle C. Middle C selects local arp clocking (not MIDI, also the default setting). C# selects quarter note clocking, D selects eighth note, D# selects sixteenth note, and E selects thirty-second note arp clocking. The MIDI channel and arp clocking setting are retained until set to a different value using the same method. Here is a text file containing the instructions, which also explains how to set the starting MIDI note number for the interface.
Please note: This interface does not allow saving, changing, editing, or restoring patches, or doing anything other than playing notes and clocking the arpeggiator over MIDI. It should only be assembled and installed by someone with an adequate understanding of electronics. If it is assembled or installed incorrectly, damage to the PolySix circuitry could result. I will not be responsible for any damage to any instrument caused by either proper or improper use of the design presented here.
I am offering pc bds for $30 each (plus S&H) and programmed PIC chips for $7 each. Please contact me if you are interested. I will not offer assembled boards. You will need to order the other parts yourself and put it together. Do not attempt this unless you have decent soldering skills. Here is a parts list for the interface. Here is a parts placement diagram for the board.
Since the board is heavier than the original chip, and larger as well, you will probably want to secure it in some way to keep it from coming unplugged. I have not yet worked out the best way to do that. Possibly double-stick foam between the bottom of the pcb and the IC socket?
Korg MIDI Interface for the Poly Six:
Here is a schematic that I recently captured for the MIDI interface that Korg USA created for the Poly Six.